Image....Detecting....
이미지 인식에는 다양한 모델들이 있는데,
(제일 유명한 Yolo부터 해서 cnn이미지 인식 모델들, Resnet... 등등 )
그 중에서 Template Matching을 사용해보기로 했습니다.
이걸 실제로 사용하게 될지는 모르겠지만, 일단 지금까지 개발한 것 까지 정리해보려 합니다.
Template Matching..이란?
OpenCV: Template Matching
Goals In this chapter, you will learn Theory Template Matching is a method for searching and finding the location of a template image in a larger image. OpenCV comes with a function cv.matchTemplate() for this purpose. It simply slides the template image o
docs.opencv.org
다른 모델들과는 다른느낌... (이걸 모델이라고 할 수는 없을꺼 같긴합니다..)
이미지를 학습해서 인식하는 다른 인공지능 모델과는 다르게,
특정 템플릿 이미지를 인식이 필요한 이미지에서 다양한 위치값에 위치시켜보며 유사성으로 이미지를 판단하는 방법!
그렇기에 간단하게 구현할 수 있고, 무엇보다 정확한 이미지나 패턴에 대해서 빠르게 인식가능하다는 장점을 가집니다!
또! CV2에서 해당 함수를 구현해놓았기에 아래와 같은 형식으로 사용하면 끝
cv2.matchTemplate(대상이미지, 찾고자하는 이미지, 매칭방법)
매칭방법에 따라 다음의 알고리즘들을 적용 시켜서, 이미지 인식에 대한 정도를 변경할 수도 있습니다!
- TM_SQDIFF: 템플릿과 원본 이미지 간의 제곱 오차 합을 계산합니다. 값이 작을수록 유사도가 높습니다.
- TM_CCORR: 상관 계수를 이용하여 유사도를 측정합니다. 값이 클수록 유사도가 높습니다.
- TM_CCOEFF: 상관 계수의 차이를 계산합니다. 값이 클수록 유사도가 높습니다.
++ 추가로 각 알고리즘에는 정규화 버전들이 있어서
TM_CCOEFF_NORMED, TM_CCORR_NORMED, TM_CCOEFF_NORMED들이 추가로 사용할 수 있습니다.
하지만... 역시 학습된 모델을 따라가지 못하는 부분이 있는데,
가장 큰 문제점이 템플릿 이미지와 정확하게 동일해야 인식이 가능하다는점..
(크기나 회전이 변경되면 인식율이 저하됩니다.)
그래서 그런지 현실세계에 대한 인식? (영상에서 사람을 찾는다던가, 차량을 추적한다던가) 보다는,
특정 문서의 텍스트 추적이나 시점이 변하지 않는 게임속 아이템, 플레이어 추적 등
사용할 수 있는 영역이 너무 한정적인것 같습니다.
그래서 이번엔 회전과 크기에 대해 약간이라도 대응할 수 있는 템플릿 매칭을... 만들어보려고! 합니다. (약간 모자람)
그럼 코드 시작!
코드구성!
일반적인 경우에 실험 코드는...
다음과 같은 코드 한줄로 끝나긴 합니다
res = cv2.matchTemplate(image, templateImage, cv2.TM_CCOEFF_NORMED)
해당 리턴값은 다음과 같이 정리하여 사용할 수 있습니다.
min_val, max_val, min_loc, max_loc = cv2.minMaxLoc(res)
매칭점수들과 그 바운딩 박스에 대한 리스트인데,
최솟값들은 필요없고..... 최댓값 부분만 사용해 줍시다.
그럼 다음과 같은 방식으로 타겟된 이미지를 찾을 수 있습니다.
def templateMathcing(display_Frame, template):
    for _, BaseImage in enumerate(display_Frame):

        copyFrame = BaseImage.copy()
        th, tw = template.shape[:2]


        # 템플릿 매칭 실행
        res = cv2.matchTemplate(copyFrame, template, cv2.TM_CCOEFF_NORMED)
        min_val, max_val, min_loc, max_loc = cv2.minMaxLoc(res)


        cv2.rectangle(copyFrame, max_loc,  (max_loc[0] + tw, max_loc[1] + th), (0, 0, 255), 2)
        cv2.putText(copyFrame, f"Good ({max_val:.2f})",
                        (max_loc[0], max_loc[1] - 10),
                        cv2.FONT_HERSHEY_SIMPLEX, 0.5, (0, 255, 0), 1, cv2.LINE_AA)

        cv2.imshow('output', copyFrame)
        cv2.waitKey(0)
        cv2.destroyAllWindows()
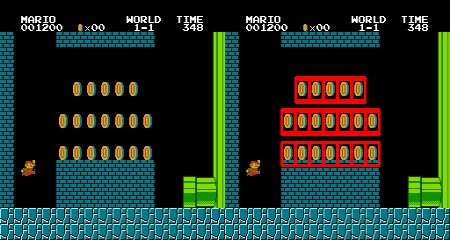
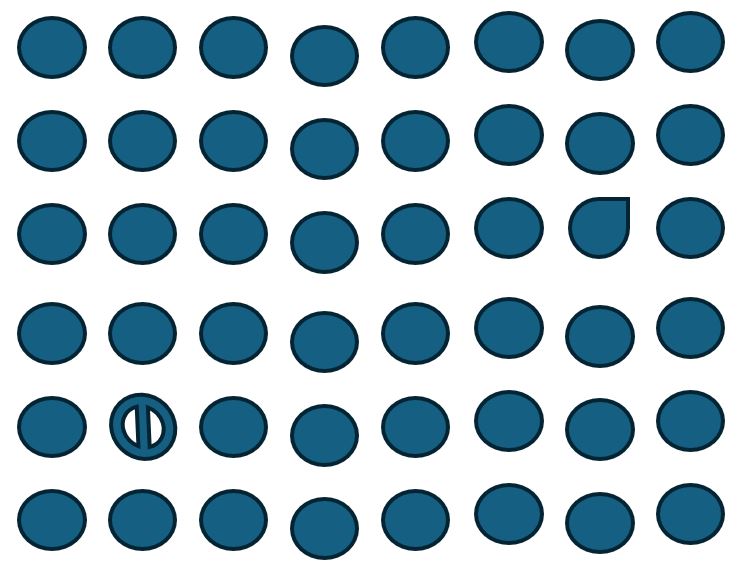
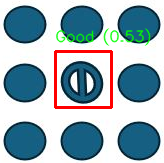
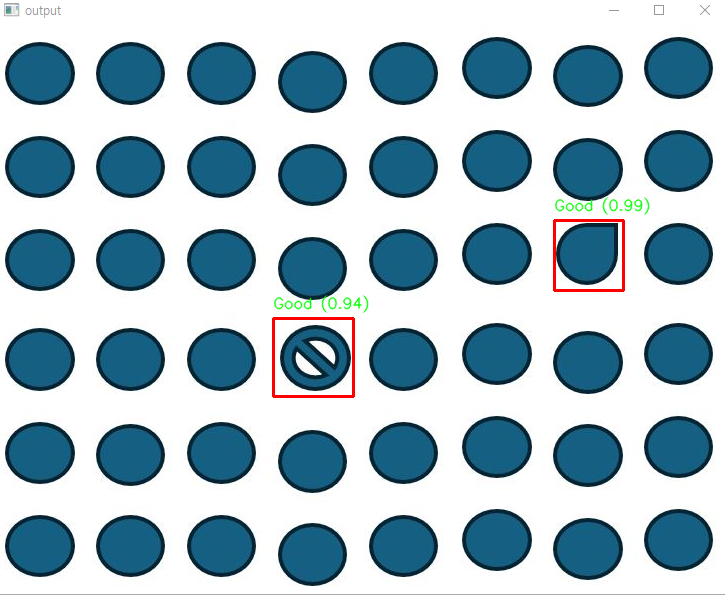
저는 아래 템플릿을 통해 실험 해보았습니다!


굳굳 잘 잡히네요, 1단계 끝!
다음 다음
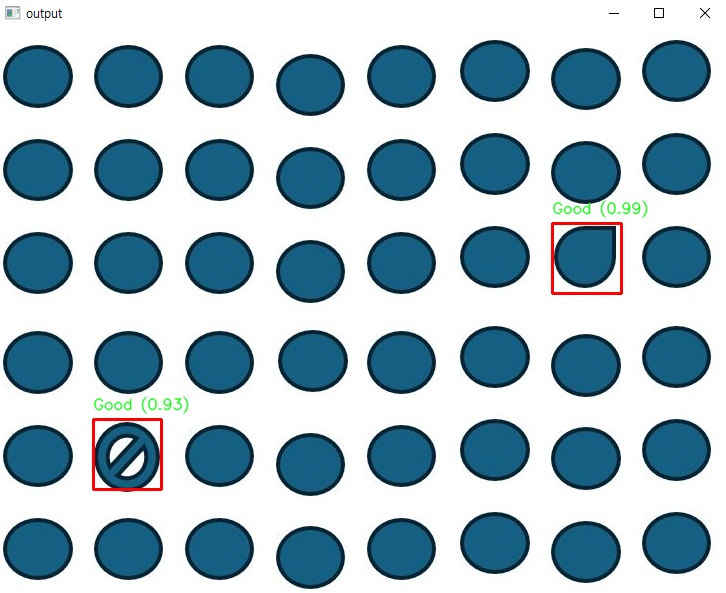
여러 이미지와 템플릿에 대해서 처리..
root = os.path.dirname(os.path.realpath(__file__))


Ori_dir = os.path.join(root, 'Image_1')  ## 일반 이미지
Ori_files = sorted([os.path.join(Ori_dir, f) for f in os.listdir(Ori_dir) if f.endswith(('.jpg', '.png'))])


Img_dir = os.path.join(root, 'Template')  ## 추적할 이미지
Img_files = sorted([os.path.join(Img_dir, f) for f in os.listdir(Img_dir) if f.endswith(('.jpg', '.png'))])


def templateMathcing(display_Frame, templates):
    for _, BaseImage in enumerate(display_Frame):
        copyFrame = BaseImage.copy()

        for template_idx, template in enumerate(templates):
            th, tw = template.shape[:2]

            # 템플릿 매칭 실행
            res = cv2.matchTemplate(copyFrame, template, cv2.TM_CCOEFF_NORMED)
            min_val, max_val, min_loc, max_loc = cv2.minMaxLoc(res)

            cv2.rectangle(copyFrame, max_loc, (max_loc[0] + tw, max_loc[1] + th), (0, 0, 255), 2)
            cv2.putText(copyFrame, f"Good ({max_val:.2f})",
                            (max_loc[0], max_loc[1] - 10),
                            cv2.FONT_HERSHEY_SIMPLEX, 0.5, (0, 255, 0), 1, cv2.LINE_AA)

        cv2.imshow('output', copyFrame)
        cv2.waitKey(0)
        cv2.destroyAllWindows()


if __name__ == "__main__":
    display_Frame = [cv2.imread(img_file,cv2.IMREAD_UNCHANGED) for img_file in Ori_files]
    TemplateImages = [cv2.imread(img_file,cv2.IMREAD_UNCHANGED) for img_file in Img_files]

    templateMathcing(display_Frame,retemplates)
굳굳 2단계 끝....
마지막.....
이번엔 회전과 크기에 대해서 대응해보았습니다.
알고리즘이 아니라, 단순히 템플릿 이미지를 리사이즈 하고, 회전시켜
템플릿에 대한 추가 템플릿을 생성해 주어 문제를 해결하고자 하였습니다.
그래서... 속도가 엄청 느려지는..... 그래도 만약 꼭 템플릿 매칭을 사용해야되는 경우에!
아래와 같은 방법으로 해결가능해 보입니다...!
템플릿을 회전시키고 크기를 조절시키는 함수를 추가하였습니다.
아래가 회전함수....
def rotate_image(image,angle):
    center = (image.shape[1] // 2, image.shape[0] // 2)
    matrix = cv2.getRotationMatrix2D(center, angle, 1.0)


    abs_cos = abs(matrix[0, 0])
    abs_sin = abs(matrix[0, 1])
    new_width = int(image.shape[0] * abs_sin + image.shape[1] * abs_cos)
    new_height = int(image.shape[0] * abs_cos + image.shape[1] * abs_sin)

    matrix[0, 2] += (new_width / 2) - center[0]
    matrix[1, 2] += (new_height / 2) - center[1]

    if len(image.shape) == 2:  # 흑백사진 == grayscale
        white_background = np.full((new_height, new_width), 255, dtype=np.uint8)
    else:  # 컬러 사진
        white_background = np.full((new_height, new_width, 3), (255, 255, 255), dtype=np.uint8)
    rotated_image = cv2.warpAffine(image, matrix, (new_width, new_height), dst=white_background, borderMode=cv2.BORDER_CONSTANT, borderValue=(255, 255, 255))
    return rotated_image
그다음은 리사이즈 함수!
# 원래 비율을 유지하며 리사이즈 함수
def resize_image(image, target_size):
    h, w = image.shape[:2]
    aspect_ratio = w / h  # 가로:세로 비율 계산

    if w > h:
        # 가로가 더 긴 경우, 가로를 target_size에 맞추고 세로를 비율에 맞게 조정
        new_width = target_size
        new_height = int(target_size / aspect_ratio)
    else:
        # 세로가 더 긴 경우, 세로를 target_size에 맞추고 가로를 비율에 맞게 조정
        new_height = target_size
        new_width = int(target_size * aspect_ratio)
    newImage=cv2.resize(image, (new_width, new_height))

    return newImage
다음은 이 둘을 이용해서 템플릿 리스트를 만들어 주는 함수입니다.
def rotate_ImageGroups(TemplateImages,angleStart=0,angleSet=5,StepsSet=1, sizes=[]):

    template_list=[]

    for image in TemplateImages:
        resized_templates = []
        for size in sizes:
            resized_templates.append(resize_image(image, size))


        rotated_and_resized = []
        for img in resized_templates:
            for angle in range(angleStart, angleSet, StepsSet):
                tempimg = rotate_image(img, angle)
                if tempimg.shape[2] == 4:
                    tempimg = cv2.cvtColor(tempimg, cv2.COLOR_BGRA2BGR)
                rotated_and_resized.append(tempimg)

        template_list.extend(rotated_and_resized)


    return template_list
아래처럼 사용하면
    target_sizes  = [65,70,75,80]

    display_Frame = [cv2.imread(img_file,cv2.IMREAD_UNCHANGED) for img_file in Ori_files]
    TemplateImages = [cv2.imread(img_file,cv2.IMREAD_UNCHANGED) for img_file in Img_files]
    retemplates=[]

    retemplates = rotate_ImageGroups(TemplateImages,angleStart=0,angleSet=360,StepsSet=5,sizes=target_sizes)
기본템플릿에서 회전과 리사이즈를 거쳐 증강되며, 아래처럼 만들어 집니다!
retemplates =[[~~~~,~~~~,~~~~],[~~~,~~~~,~~~], .....]
아래코드를 통해
    for templateGroups in retemplates:
        for i,image in enumerate(templateGroups):
            print(i)
            cv2.imshow('output', image)
            cv2.waitKey(0)
            cv2.destroyAllWindows()
회전 템플릿들이 어떻게 생성되는지 확인 가능합니다.


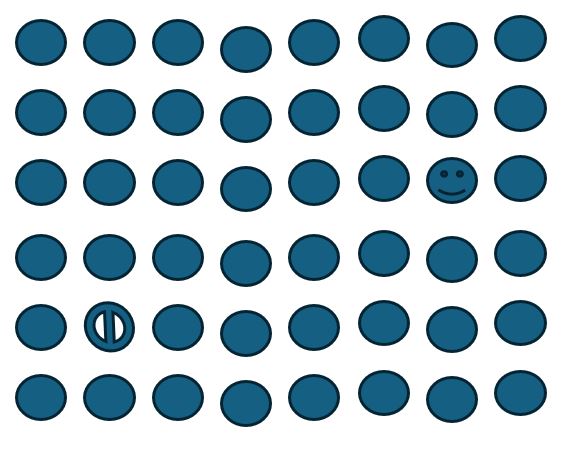
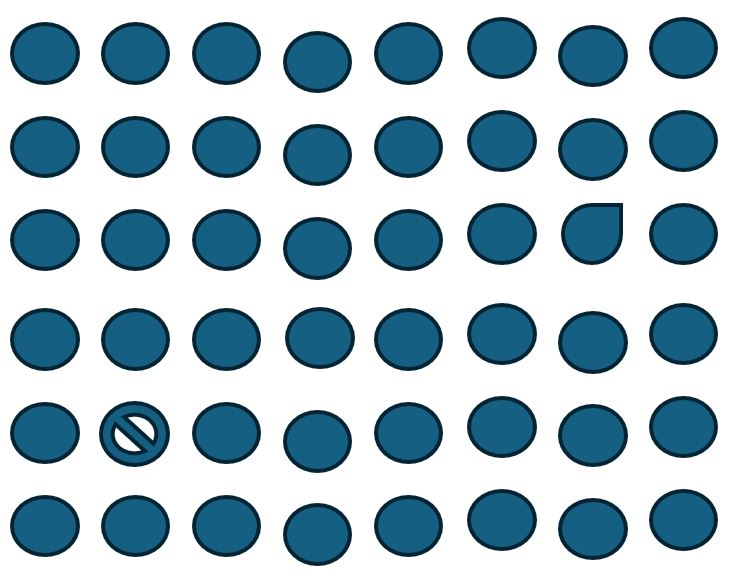
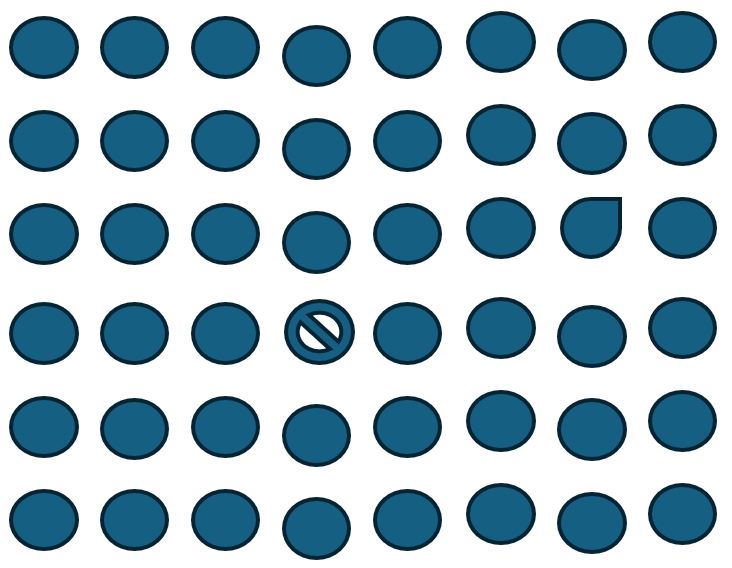
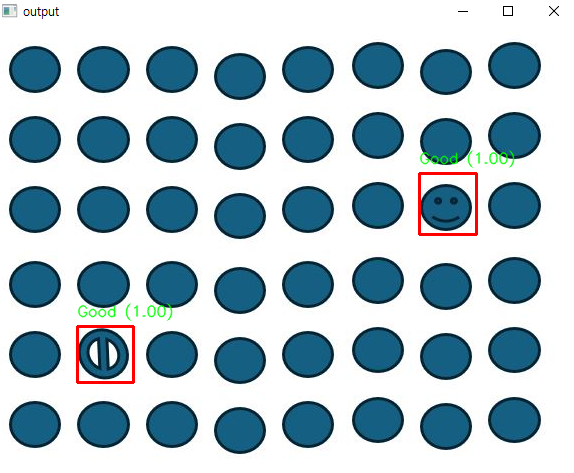
추가로 어떤 템플릿에 Detecting되었는지를 체킹하기 위해,
증강된 템플릿들간의 최고 신뢰도를 기준 하나만 선정하여 박스를 그려주었습니다.
def templateMathcing(display_Frame, templates):
    for _, BaseImage in enumerate(display_Frame):
        copyFrame = BaseImage.copy()

        best_score = -1  # 각 템플릿 리스트에 대한 최고 신뢰도 초기화
        best_top_left = None
        best_bottom_right = None

        for templateGroups in templates:
            for template_idx, template in enumerate(templateGroups):
                th, tw = template.shape[:2]
                # 템플릿 매칭 실행
                res = cv2.matchTemplate(copyFrame, template, cv2.TM_CCOEFF_NORMED)
                min_val, max_val, min_loc, max_loc = cv2.minMaxLoc(res)

                # 최고 신뢰도를 가진 템플릿의 위치 및 값 저장
                if max_val > best_score:
                    best_score = max_val
                    best_top_left = max_loc
                    best_bottom_right = (max_loc[0] + tw, max_loc[1] + th)

            cv2.rectangle(copyFrame, best_top_left, best_bottom_right, (0, 0, 255), 2)
            cv2.putText(copyFrame, f"Good ({best_score:.2f})",
                            (best_top_left[0], best_top_left[1] - 10),
                            cv2.FONT_HERSHEY_SIMPLEX, 0.5, (0, 255, 0), 1, cv2.LINE_AA)

        cv2.imshow('output', copyFrame)
        cv2.waitKey(0)
        cv2.destroyAllWindows()
굳굳 회전한 오브젝트도 어느정도 잡아주는 모습을 보입니다.
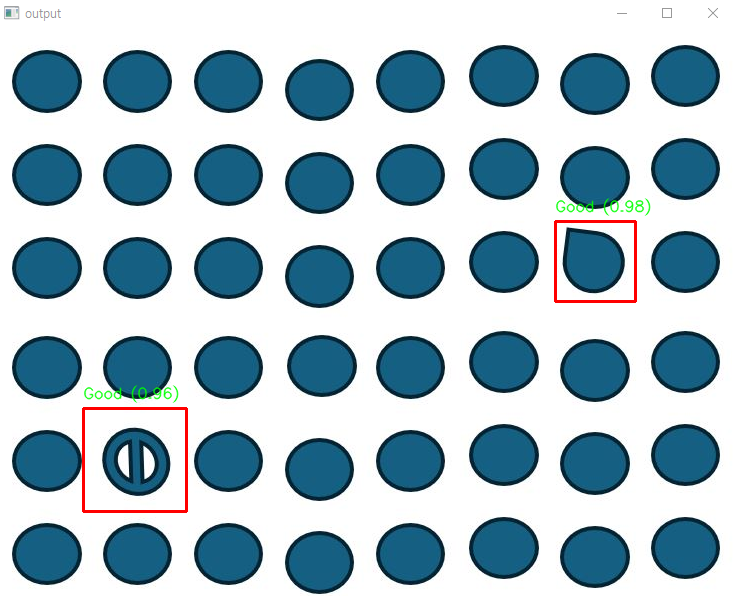
다시 한번 말씀드리면, 단순히 템플릿을 늘려버려서!
(위와 같은 경우에는 [기존 2개] *[리사이즈 4] * [각도 360/5] = 288 개의 템플릿)
다양한 크기와 각은.... 찾을순 있는데! 많이 느려지는것 같습니다.... 그래도 찾아는 지니까 굳굳
아래는 전체 코드!
import cv2
import os
import numpy as np

root = os.path.dirname(os.path.realpath(__file__))

Ori_dir = os.path.join(root, 'Image_1')  ## 일반 이미지
Ori_files = sorted([os.path.join(Ori_dir, f) for f in os.listdir(Ori_dir) if f.endswith(('.jpg', '.png'))])


Img_dir = os.path.join(root, 'base')  ## 추적할 이미지
Img_files = sorted([os.path.join(Img_dir, f) for f in os.listdir(Img_dir) if f.endswith(('.jpg', '.png'))])

# 리로테이션?
def rotate_image(image,angle):
    center = (image.shape[1] // 2, image.shape[0] // 2)
    matrix = cv2.getRotationMatrix2D(center, angle, 1.0)


    abs_cos = abs(matrix[0, 0])
    abs_sin = abs(matrix[0, 1])
    new_width = int(image.shape[0] * abs_sin + image.shape[1] * abs_cos)
    new_height = int(image.shape[0] * abs_cos + image.shape[1] * abs_sin)

    matrix[0, 2] += (new_width / 2) - center[0]
    matrix[1, 2] += (new_height / 2) - center[1]

    if len(image.shape) == 2:  # 흑백사진 == grayscale
        white_background = np.full((new_height, new_width), 255, dtype=np.uint8)
    else:  # 컬러 사진
        white_background = np.full((new_height, new_width, 3), (255, 255, 255), dtype=np.uint8)
    rotated_image = cv2.warpAffine(image, matrix, (new_width, new_height), dst=white_background, borderMode=cv2.BORDER_CONSTANT, borderValue=(255, 255, 255))
    return rotated_image


# 원래 비율을 유지하며 리사이즈 함수
def resize_image(image, target_size):
    h, w = image.shape[:2]
    aspect_ratio = w / h  # 가로:세로 비율 계산

    if w > h:
        # 가로가 더 긴 경우, 가로를 target_size에 맞추고 세로를 비율에 맞게 조정
        new_width = target_size
        new_height = int(target_size / aspect_ratio)
    else:
        # 세로가 더 긴 경우, 세로를 target_size에 맞추고 가로를 비율에 맞게 조정
        new_height = target_size
        new_width = int(target_size * aspect_ratio)
    newImage=cv2.resize(image, (new_width, new_height))

    return newImage


def rotate_ImageGroups(TemplateImages,angleStart=0,angleSet=5,StepsSet=1, sizes=[]):
    template_list=[]

    for image in TemplateImages:
        resized_templates = []
        for size in sizes:
            resized_templates.append(resize_image(image, size))

        rotated_and_resized = []
        for img in resized_templates:
            for angle in range(angleStart, angleSet, StepsSet):
                tempimg = rotate_image(img, angle)
                if tempimg.shape[2] == 4:
                    tempimg = cv2.cvtColor(tempimg, cv2.COLOR_BGRA2BGR)
                rotated_and_resized.append(tempimg)

        template_list.append(rotated_and_resized)

    return template_list


def templateMathcing(display_Frame, templates):
    for _, BaseImage in enumerate(display_Frame):
        copyFrame = BaseImage.copy()

        best_score = -1  # 각 템플릿 리스트에 대한 최고 신뢰도 초기화
        best_top_left = None
        best_bottom_right = None

        for templateGroups in templates:
            for template_idx, template in enumerate(templateGroups):
                th, tw = template.shape[:2]
                # 템플릿 매칭 실행
                res = cv2.matchTemplate(copyFrame, template, cv2.TM_CCOEFF_NORMED)
                min_val, max_val, min_loc, max_loc = cv2.minMaxLoc(res)

                # 최고 신뢰도를 가진 템플릿의 위치 및 값 저장
                if max_val > best_score:
                    best_score = max_val
                    best_top_left = max_loc
                    best_bottom_right = (max_loc[0] + tw, max_loc[1] + th)

            cv2.rectangle(copyFrame, best_top_left, best_bottom_right, (0, 0, 255), 2)
            cv2.putText(copyFrame, f"Good ({best_score:.2f})",
                            (best_top_left[0], best_top_left[1] - 10),
                            cv2.FONT_HERSHEY_SIMPLEX, 0.5, (0, 255, 0), 1, cv2.LINE_AA)

        cv2.imshow('output', copyFrame)
        cv2.waitKey(0)
        cv2.destroyAllWindows()


if __name__ == "__main__":

    target_sizes  = [65,70,75,80] # 굳이 여러개 필요할까?

    display_Frame = [cv2.imread(img_file,cv2.IMREAD_UNCHANGED) for img_file in Ori_files]
    TemplateImages = [cv2.imread(img_file,cv2.IMREAD_UNCHANGED) for img_file in Img_files]
    retemplates=[]

    retemplates = rotate_ImageGroups(TemplateImages,angleStart=0,angleSet=360,StepsSet=5,sizes=target_sizes)

    # for templateGroups in retemplates:
    #     for i,image in enumerate(templateGroups):
    #         print(i)
    #         cv2.imshow('output', image)
    #         cv2.waitKey(0)
    #         cv2.destroyAllWindows()

    templateMathcing(display_Frame,retemplates)
틀린점이 있다면 댓 달아주세요!
'공부공부 > 2025 쌓아가는 나의 지식~' 카테고리의 다른 글
| [BVH] bvh 파일 유니티 애니메이션으로 적용시키기 (Blender 포함) (0) | 2025.04.18 |
|---|---|
| Bio데이터 분석 및 시각화 툴 제작 (1) (0) | 2025.04.01 |
| [OpenCV / Python] 이미지 유사도(Image Similarity) 측정 [Pixel, Structural, Histogram] (0) | 2025.03.19 |
| Yolo모델을 이용한 오브젝트 분류(Object Classification) - 학습 및 실행 (1) | 2025.03.07 |
| Yolo모델을 이용한 오브젝트 인식(Object Detection) - 학습 및 실행 (0) | 2025.02.28 |


댓글